Calling people is an integral component in our day-to-day business, so there must be a quick way of starting calls. In the past, we had an asterisk pbx, which can be operated in a quite flexible way.
When we became a 3cx partner, we switched our telephone system from the asterisk to 3cx and obviously, our past script wasn’t working anymore.
There is no easy way of triggering calls via e.g. a REST API. We’ve searched on the internet, read through the 3cx forums and reddit, yet the only thing related to a REST API in 3cx was the lack thereof. On their GitHub page, 3cx has (next to the Jenkins meme plugin) only the call flow demos which we didn’t want to try as the call flow desinger is only available for windows. Custom solutions such as https://creomate.com/3cx-api-faq exist, however, we simply wanted to trigger calls without installing some proprietary binary on our pbx.
It is possible with the 3cx webui to initiate a call on a desk phone, so there MUST be a way to trigger it via a script, right? Right… This was actually harder than we thought. By using the dev tools we found out, that there are many POST requests, yet the base64 responses to those requests were partly some non-printable bytesequences, partly something like COQBog4xCAESKkNhbGwgdG8ge2Rlc3RpbmF0aW9ufSBoYXMgYmVlbiBpbml0aWFsaXplZBjjAQ== (translates to *Call to {destination} has been initialized for those who cannot read it on the spot).
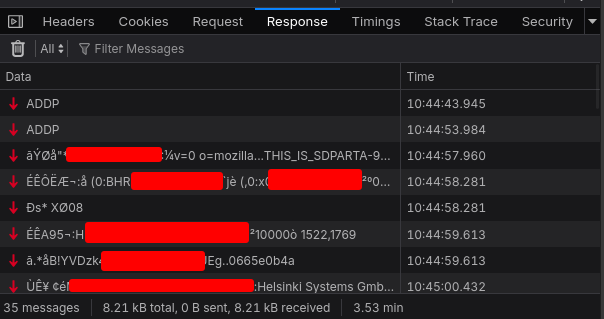
So there must be something else going on, as the frontend was showing some information it couldn’t have known from the responses to the POST requests. Going through all requests, there was one websocket request that seemed interesting.
Looking at the webtraffic, the websocket didn’t seem to do anything
And only after some time, we checked the “Response” tab, which revealed the function of the websocket:
The 3cx webclient uses POSTs for sending data from the webclient to the server and the websocket only for receiving results from the server. Using a websocket here makes sense, as the client can notice an incoming call really fast through server push, but why the webclient isn’t using full duplex communication remains a secret.
Copying together the POST requests and the websocket responses into a python script, we played around with the parameters to try to find out, how to trigger a call on a desk phone programmatically.
We came up with a python script that takes an extension number, the password to that extension and a number to call. It logs the user into the 3cx webclient, establishes a websocket, sends some magic bytes to get the phone configuration and finally triggers the call by providing the phone id and the phone number.
Go ahead and take a look at the code at https://github.com/helsinki-systems/3cx-callscript, there are several comments that try to explain stuff like what the call-triggering body has to include to be working. The script is still quite rough, but it works smoothly for us and is in daily use since quite some time now. There is also a .desktop file that, when added to the correct location and linked to the correct script location, allows clicking tel: links on websites to directly trigger calls from applications like a web browser.
Couple the call script with some other script that syncs contacts locally (e.g. by using vdirsyncer, khard and rofi) and you got yourself a nice and quick way of dialing numbers without having to type them into the phones keypad or the 3cx webclient.
This blog post is split into two parts. Part 1 is the journey to the solution, Part 2 is how to setup our Let’s Encrypt tool on your Sophos firewall. If you are only interested in the latter you can skip ahead.
Journey to a working prototype
For those that dont know what a Sophos XGS is: it’s a firewall product offered by Sophos and its a “replacement” product for the previous Sophos XG and Sophos UTM.
The Sophos UTM used to have excellent support as a web application firewall with Let’s Encrypt, but Sophos removed that feature in the XG and XGS version of their firewall offering. As we use Let’s Encrypt for most of our customers we set out to work around that.
If you Google for solutions you are either offered to use Sophos Factory or to use Let’s Encrypt on another host (windows/linux) that pushes the certificates to the Sophos firewall. It was not satisfying for us to run the certificate renewal process on different hosts so we decided to try to do the whole process on the firewall itself.
A XGS runs a Linux Kernel 4.14 and allows ssh login and a real shell via 5. Device Management -> 3. Advanced Shell. We figured this could be used to run the required programs. We decided to use the excellent acme.sh client to try to get a working http acme process and then see if we can use this to get a working setup.
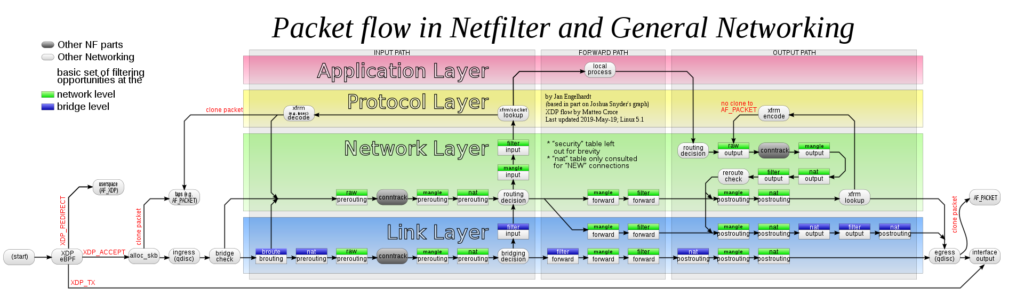
For a working HTTP acme process you need port 80 to serve static files that are provided by acme.sh. To achieve that we tried getting the httpd that is running on the XGS to serve those files on any port for a start. This turned out to be rather tricky as the httpd config on a XGS requires ports and file locks that are already in use by the Sophos web interface. Luckily the XGS includes a python3 version, with a http module. So we got a working webserver that was serving files on a port of our choice like 8000 but not 80. Port 80 is either used by httpd when the “waf http to https redirection” is enabled or the Sophos iptables firewall rules drop the pakets somewhere between the prerouting and input filter (See Link Layer part of the Diagramm, our python webserver is running on the red application layer).
Packet path that a packet takes through the ip tables firewall
Our initial reaction was to disable the http to https forwarding and add iptable rules to get the packets to our python webserver running on port 80. But we could not figure out which rules that are responsible for dropping those packets and it was quite ugly approach as it required to deactivate the http to https redirection.
After some consideration we had the idea to just redirect the port to our python webserver during the acme process, with
This approach allowed us to not touch any Sophos settings and redirect the port for the time being and worked like a charm.
With having a webserver that serves our static files generated by acme.sh we were all set to extend this proof of concept to a script that automatically renews Let’s Encrypt certificates running fully on a Sophos XGS.
To have a real prototype we would need a storage path that is permanent between reboots of the XGS and mechanism to run our script every day.
The storage path problem was solved quite easily but just creating an acme folder in /config/ and reboot the firewall to test if our folder was still there, as it was after a reboot so we moved to the next problem.
Running a script everyday on a linux machine is usually done by cronjob or a systemd timer. Both mechanisms are not available on a Sophos XGS. So we tried the little more obscure command at which was also not available. So we opted to use a while loop with sleep to run every day. Which solved the timing problem, but we still needed something in the system to start our script after each reboot.
As the sophos xgs is a busy box system rc.d init scripts are supported and after mounting the root file system read/writable we where able to add a short script to it S01acme which just launches our renew.sh and does not wait for completion. After we where done we switchted the root filesystem back to read only.
With all those building blogs we where able to implement a working lets encrypt client directly on the sophos.
How to setup sophos-xgs-letsencrypt
First you need to login to your sophos via ssh and open an advanced shell. Then you can run
sh -c "$(curl https://raw.githubusercontent.com/helsinki-systems/sophos-xgs-letsencrypt/main/setup.sh)"
This should take care of the installation and setup your letsencrypt account. For more info head over to the sophos-xgs-letsencrypt GitHub
After that you need to configure which domains and certificates that should be renewed, this is done by editing the /var/acme/config.csv (; semicolon seperated) with vim. Each row contains the name from the certificate in sophos webinterface in the first field and in the second field a list of domains to be requested for that certificate (seperated with a comma ,) If you don’t have a current certificate name just pick one and use it later in the web interface (in our example that’s OWA)
To get the name for the first field you need to upload a certificate with the pem format to the Sophos web interface (under Certificates).
After the configuration is done you need to run /var/acme/renew.sh to request the certificates for the first time.
Depending on if you are adding an already existing certificate to Let’s Encrypt, as in it already existed in your Sophos XGS, you are done now congrats. Otherwise there is another step.
If you do not have the certificate in your XGS yet you need to copy it to your computer using scp on linux or WinSCP on Windows.
and reupload them using the sophos web interface under certificates.
Upgrading the Firewall
When you upgrade your firewall you have to rerun the /var/acme/setup.sh to readd the scripts to the sophos system.
Future features and open questions
Firmware Upgrade persistence
Currently we don’t know what happens to our folder in /var/acme after a firmware update if somebody knows the answer or is willing to test it and share their results, we would be happy to know (sophos@helsinki-systems). We ran a quick test upgrading from 19.5 to 20.0 and our old config folder was gone after the upgrade as well as our init script. So we switchted back to /var/acme
Old experiy stats in the sophos webinterface
Currently the expiry stats in the sophos webinterface are not updated after a certificate is renewed. If we find out where those information is stored this could be updated as well. Or handeld via the sophos firewall api
Redirect all other requests to https while running
Currently while the acme is running we are not redirecting the requests to https, but this could easily be added by a little python code.
Warranty
As it has been pointed out by the excellent LuCar Toni in the sophos community forum. Thinkering with your firewall could void the warranty. So be careful of what you do.
“It would be nice to escape the cold and rainy weather of German winter” is something a lot of Germans would say during the cold season of December. So we did. Andy and Janne (which will now be referred as “us” or “we”) got the honor of being invited to the NixOS Ocean Sprint in Lanzarote on the Canaries. It was honestly great to escape home after not leaving home for about two years due pandemic-related reasons. While we were told it was the coldest December in a long time it was million times better than what we got reported from home. Spending time in the sun in December is just great.
While this sounds like NixOS-sponsored vacation it was actually a very productive week of “intense NixOS hacking” (as the Ocean Sprint website puts it). In total there were 14 people hacking in a villa in Costa Teguise. We were able to exchange ideas, come up with new concepts and help each other out. There wasn’t a greater goal, just everyone bringing their NixOS projects to an island and working on them together with others. It was good to finally meet the people you have been working along for years now and being able to cooperate in person was really motivating and helped to do a lot of work very quickly. There were all sorts of larger projects, medium-size projects (like us working on switch-to-configuration.pl or refactoring the MariaDB packaging), and small ones like the regular reviewing/merging efforts along with discussions about helping the organization to steer into a more organized form.
All this being said, it wasn’t just work either. We were able to enjoy volcano climbing, body surfing, and more, along with the great weather and awesome people to spend the time with, just chatting. Most of us took another week of vacation to see more of the island and just to have a good time.
Ok, the headline is kind of sensational, but this post does actually talk about how you can make your XFS store files with timestamps after 2038 and how that can be done nicely with NixOS.
The Problem
The X FileSystem, more commonly known as XFS, has historically only supported timestamps until 2038.
However, in version 5.10 of the Linux kernel, the XFS maintainers landed the bigtime feature, which allows for “inode timestamps from December 1901 to July 2486, and quota timer expirations from January 1970 to July 2486”. GRUB2 from version 2.06 also allows you to boot from such a filesystem.
Changing these feature flags does however require running a xfs_admin command while the filesystem is not mounted, because it needs to modify some on-disk metadata structures.
The Solution
Since we did not want to reboot every system into a live system and perform this manually or re-image them or whatever else one could do, we came up with the following idea: Why not just do this in the initramfs, before the filesystems are mounted?
Luckily, NixOS offers a handful of options to add custom scripts and binaries to the initramfs.
So we got to work and implemented a NixOS module, as we do.
This is what we came up with:
{ config, lib, pkgs, utils, ... }: let
  # TODO: remove "/nix" filter, once feature is declared stable by upstream
  fileSystems = builtins.filter (fs: utils.fsNeededForBoot fs && fs.fsType == "xfs" && fs.mountPoint == "/nix") config.system.build.fileSystems;
in {
  config = lib.mkIf (fileSystems != []) {
    boot.initrd = {
      extraUtilsCommands = /* sh */ ''
        copy_bin_and_libs ${pkgs.xfsprogs}/bin/xfs_admin
        copy_bin_and_libs ${pkgs.xfsprogs}/bin/xfs_info

        copy_bin_and_libs ${pkgs.xfsprogs}/bin/xfs_db
        copy_bin_and_libs ${pkgs.xfsprogs}/bin/xfs_spaceman
      '';

      extraUtilsCommandsTest = /* sh */ ''
        sed -i -e 's,^#!.*,#!'$out/bin/sh, $out/bin/xfs_admin $out/bin/xfs_info   # from nixos/modules/tasks/filesystems/xfs.nix
        export PATH=$out/bin:$PATH
        $out/bin/xfs_admin -V
        $out/bin/xfs_info -V
      '';

      postDeviceCommands = /* sh */ let
        # basically fsInfo from stage-1.nix, but without options and only xfs
        # we can't reuse fsInfo, because of how these things are substituted in
        xfsInfo = lib.concatMapStringsSep "\n" (fs: if fs.device != null then fs.device else "/dev/disk/by-label/${fs.label}") fileSystems;
      in ''
        echo '${xfsInfo}' | while read device; do
          if [ "$(xfs_info "$device" | grep -o 'bigtime=.')" = "bigtime=0" ]; then
            xfs_repair -n "$device" && xfs_admin -O bigtime=1 "$device"
          fi
        done
      '';
    };
  };
}
While this might seem scary at first glance, it is actually relatively straight-forward.
It does the following things:
Find the relevant filesystems. For now, this is limited to /nix, because while the XFS maintainers believe their code to be good and the on-disk format to be fine, they have still marked this feature as experimental for now (Edit: the feature is no longer marked experimental as of this commit which was released with kernel 5.15). When I last asked them, their timeline for removing this warning was “when we’ve waited long enough for nobody to find a problem”.
It adds the relevant binaries from xfsprogs to the initramfs. It also tests if they can actually be run.
It adds some shell code to the initramfs which performs the actual change on the filesystem. For each filesystem it checks if it has the feature already, if not it performs a fsck, because this change should and can only be performed on a clean filesystem and if the check succeeds it adds the feature.
After a host has a system with the configuration from this module applied to it, the only thing needed is a reboot and the filesystem will have support for the new feature. At least assuming the filesystem was clean.
XFS also gained some other potentially interesting features in recent years, like crc checks for metadata and support for copy-on-write files using reflink, both of which are enabled by default when creating a filesystem with mkfs.xfs from a recent xfsprogs version. If you have filesystems created before these features were available or enabled by default and want to enable them, the only things that need to be modified in the module are the check for which features are enabled and the xfs_admin command.
Shameless Self-Promotion
What follows is more or less just self-promotion, although it might still be relevant to your interests.
At Helsinki Systems, we run most of our infrastructure on NixOS. We decided on XFS on top of LVM2 for most of our storage needs, mainly because it provides the features we need while being very stable, relatively well integrated into the greater Linux ecosystem and without the need for out-of-tree kernel modules.
This storage stack is not particularly “sexy”. It is not ZFS, btrfs or bcachefs. It does not need to be that in our opinion. We would however like to be able to use all features it provides. For XFS that includes features like reflink copies and CRCs. For LVM2 that means thin-provisioning, raids and maybe also dm-integrity and VDO in the future.
To that end, we took over maintenance of lvm2 and xfsprogs in nixpkgs. We will also try our best to always keep them up to date in the future and inform the community of relevant changes.
In case you are looking for someone that will work on solutions as small as what we presented here or as large as packaging all of BigBlueButton for NixOS, feel free to shoot us an e-mail or give us a call. We also help with the maintenance of exim and dovecot in nixpkgs along with other packages, so we should hopefully be able to receive your e-mails 😀
So first off, Hello World! We’re Helsinki Systems and this is our blog about Linux, NixOS, and whatnot. But instead of starting of a stream of Linux posts, let’s start with something slightly different: Creating custom Windows ISOs. Why? Because it’s useful if you live in a world where installing Windows is something you do sometimes. Also it’s really handy to have a central way of upgrading all Windows installation files you handed out to your co-workers (we’ll discuss this in another post).
WinPE
As many people switching from Windows to Linux notice, most Linux distributions come pretty small by default and most functionality can be added later using some package manager. This means that the distribution used for the regular OS can also be used for a small installer – this is different with Windows. Most distros download the packages for the to-be-installed OS from the internet, which makes the installation images even smaller. Windows, on the other hand usually bundles all required files into the image which makes offline installation possible. However, the files don’t just lay around on the filesystem of your ISO. Instead they are packed into wim (Windows Imaging Format) files and not ready for use. This means the installer needs to use a different, smaller, system which is used for unpacking the wim files into the target system while also being tiny enough to be deployed via methods like PXE. This is WinPE (Windows Preinstallation Environment). WinPE doesn’t contain the files required for installing Windows and is therefore tiny compared to the Windows ISO you download from Microsoft. You could compare WinPE to a minimal linux image with a read-only root filesystem and just a shell (cmd; not PowerShell) with a few basic tools. Let’s explore that!
Getting the ADK
In order to explore WinPE, let’s build an ISO! The default Windows installer is huge and preconfigured, so we’ll build our own WinPE environment. For this, we need the Windows ADK (Windows Assessment and Deployment Kit) which you can get from here unless the link is dead by the time you discover this post. You also need the WinPE add-on (on the same page as the ADK). Last, but not least, if the current ADK version is still 1903, also install the WSIM (Windows System Image Manager) update which makes WSIM ready for use. Although this is not used for the purposes of this blog post, it’s a handy tool and might come into play in a future post. You should have a “Deployment and Imaging Tools Environment” shortcut in your start menu under the “Windows Kits” folder. I’m not sure if this needs to be run as administrator, I usually do this because I create my images in C:\.
Building WinPE
You should have your cmd open now with the correct environment. As mentioned, I work directly at C:\, so let’s copy all WinPE-related files there for a x64 installation image:
> cd C:\
> copype amd64 C:\WinPE_x64
Inside C:\WinPE_x64, you’ll find three directories. You’re likely not going to touch fwfiles, as it contains some files relevant to WinPE startup. mount is empty (we’ll get to this in a second), and media is what’s going into your WinPE image. It’s essentially the root folder of your ISO. But before exploring anything, let’s create an ISO image:
After some time, you’ll be greeted with a cmd that is running wpeinit which will exit after some time and leave you with a cmd. Time to look around!
Exploring the environment
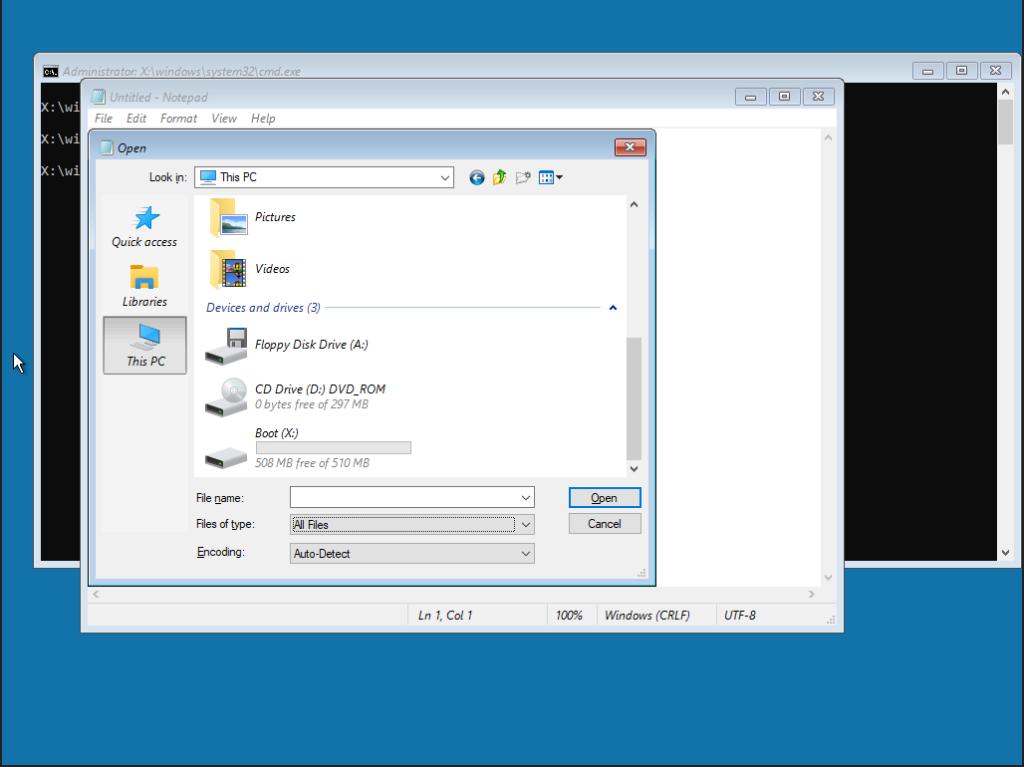
Of course, we don’t have a classic Windows shell or an explorer, so we’ll just launch notepad from the cmd and use the “Open” dialog as a file explorer (just remember to select all file-types at the bottom).
Windows finds the disk drive with the contents of the C:\WinPE_x64\media folder we used on the build machine. There is also a X:\ drive with a minimal filesystem structure. Our user is SYSTEM, so we should be able to do anything.
So before going any further, this is not a free minimal Windows you just obtained here. Looking at the Microsoft documentation, WinPE lacks a lot of features and has a hard-coded 72-hour reboot timer which prevents us from using the system for production purposes.
Now, where did we get X:\ from? At boot time, WinPE extracted media\sources\boot.wim into a ramdisk. Customizing this image file will allow us to modify the environment. As the environment is loaded into the ramdisk, all changes you make while booted into WinPE are lost after rebooting.
WinPE tooling
As we don’t have the tools we normally have like the control panel, we need something else. Microsoft gives us 3 tools: wpeinit, wpeutil, and winpeshl.
winpeshl is the tool you are likely not going to touch at all unless you’re an OEM, but I’m going to mention it for the sake of completeness. It essentially runs commands configured via a winpeshl.ini file. If the file is missing (which it is by default), it just runs the cmd you saw when booting.
wpeinit is automatically called in the cmd (this is customizable as well). When called, it initialized Plug & Play devices, parses unattend.xml settings and configures the network. If you choose to use an unattend.xml file (not discussed here), you can pass the path via the -unattend: parameter.
wpeutil is the tool to manage your running WinPE environment. You can find all command line options at the Microsoft documentation, but I’m going to mention some of the more useful options here:
Reboot and Shutdown do what you’d expect them to
SetKeyboardLayout sets the keyboard layout, but for some reason I was unable to do so, even if the command was successful
WaitForNetwork waits until the network is fully initialized (for example, until a DHCP lease is acquired)
Exploring the PE files of the ADK
As we saw, to modify the contents of X:\, we need to modify the corresponding wim image. To do that, we mount the image. As the NT kernel doesn’t have anything like fuse, it’s more of a “mount”. The image file is extracted and repackaged at umount time.
We “mounted” the image into the mount directory and are free to explore the files that are going to be mounted to X:\. For adding exe files and DLLs, I recommend adding them into Windows\System32 directly because the PATH variable is pointing there.
Before you start adding features, however, start writing some documentation. In case you need to create a new WinPE image (for example for x86 or with a newer Windows version), there is no way to get a list of changes.
To repackage the image, umount it. Before umounting, make sure no explorer or cmd has the mount directory as working directory!
Replacing /commit with /discard causes the image to be umounted, but changes are lost.
startnet.cmd
startnet.cmd is a batch script located at X:\Windows\System32\startnet.cmd or C:\WinPE_x64\mount\Windows\System32\startnet.cmd. By default, it only runs wpeinit (as we saw earlier), and adding custom commands there allows for more automated installations.
Installing Windows
While having a running WinPE system is cool and all, we wanted to install Windows from there. So the first thing to do is getting a Windows installation ISO and mounting (or extracting) it:
# mount /tmp/Win10_1909_EnglishInternational_x64.iso /mnt
Serving the installation files via SMB to make them available should be as easy as:
In case you’re using a legacy distribution, check the corresponding documentation to serve /mnt via SMB.
If you made any image modifications, rebuild the ISO as explained above. Boot it, mount the ISO, and start the installer:
> net use I: \\10.55.122.7\WInstall
> I:\setup.exe
When setup.exe finds it’s started in a WinPE environment, it behaves as the installer we know from regular Windows ISOs. That’s it, install Windows from here and you’re done.
Some tricks
These are some snippets I found and liked:
powercfg /s 8c5e7fda-e8bf-4a96-9a85-a6e23a8c635c
Running this in the WinPE environment switches to the High Performance power profile. It’s one of the first things I do in startnet.bat.
:loop
ping -n 2 127.0.0.1 > nul
net use I: \\10.55.122.7\WInstall >NUL 2>&1 || goto :loop
This retries to mount the WInstall share until it succeeds. Might be useful if the network is unstable.
wpeutil UpdateBootInfo
for /f "tokens=2* delims= " %%A in ('reg query HKLM\System\CurrentControlSet\Control /v PEFirmwareType') DO SET Firmware=%%B
if %Firmware%==0x1 echo Booted into BIOS mode
if %Firmware%==0x2 echo Booted into UEFI mode
Also useful in startnet.cmd. Shows whether the system is booted in BIOS or UEFI mode. While x64 Windows can be installed from a x86 WinPE environment, UEFI Windows cannot be installed from a BIOS-booted WinPE environment and BIOS Windows cannot be installed from UEFI-booted WinPE.
Set the keyboard layout to german. This must be done with the wim image mounted.
> del C:\WinPE_x64\media\boot\bootfix.bin
Executing this in the ADK environment and rebuilding the ISO skips the annoying “Press any key to boot from CD” and boots into the CD directly.
What’s next?
There are two things that are still bothering me. First off, having multiple languages is theoretically possible by adding multiple ISOs into the SMB share, but having one ISO with multiple languages would save a lot of disk space.
Also, this method only works when a SMB server is available. On remote sites, having a VPN to connect to, would be useful. But that’s for another post.